I’ve used linters before. Specifically for JavaScript. But this will mark the first time I’m using a linter to improve my code formatting on PHP. I had heard of CodeSniffer before, and I also already knew it’s bundled with VVV. So I thought: “You know, it may be easier if I can get this working straight in my IDE instead”.
The kicker, however, is that I do a lot of my development at home on a Windows machine. This generally means I have to jump through a few more hoops, use elevated command line tools, and abuse the environment variables system to get things to work properly. Luckily, getting the PHP CodeSniffer linter to work in Atom wasn’t that bad. Here’s what I did to get this to work and to get the WordPress sniffer rules in Atom.
Install PHP and PEAR
To start things off, you will want to install PHP and PEAR. In that order, since PEAR is a package library for PHP applications. PHP may already be installed if you’re running a local server installation like XAMPP or WAMP. If that is the case, you can skip it but do make sure you don’t forget to add it to your system’s PATH variable.
If you, like me, use Vagrant for your local server needs, then you will want to download PHP from php.net. You will want to download a VC build zip package and extract it somewhere easy to find (I tend to drop these things into a folder called “dev” on my C drive, ie. C:\dev\php).
Once extracted, you will need to add the folder to your system’s PATH variable so that you can use it on your CLI. If you’re not sure how to do this, please refer to this article on computerhope.com describes how to set up Windows system variables.
To confirm you did it right, open up the command line (Windows Key + R, then type “cmd” and press Enter) and then type “php -v” (without quotes). If this results in “php is not recognized as an internal or external command” then it’s not set up properly in your system path. Make sure that if you make any changes to that, to restart your command line tool.
If you see the version of PHP you have, then you’re ready to install PEAR! To do this, download the go-pear.phar file from https://pear.php.net/go-pear.phar. It’s a large file, and will most likely open as a plain text file in your browser, so the easiest way to download it is to right click and hit “Save”.
Once downloaded, you can simply run php go-pear.phar in your command prompt from the folder you saved it in. This will start the PEAR installation process and it will ask you for a number of things before installing PEAR. The default settings it comes up with should work just fine, since it simply figures out where your PHP is installed. After it’s done installing, you will need to add the path it’s installed in to your system’s PATH variable. That way, you will also be able to use PEAR in your command prompt (remember to restart your cmd window after doing this).
Install PHP CodeSniffer and WordPress rules
With PHP and PEAR installed you will now be able to install PHP CodeSniffer with one simple command: pear install PHP_CodeSniffer
This will let you use the phpcs command from the command prompt. Go ahead and try it out on a PHP file you may already have (ie. phpcs my-php-file.php). Or just try printing the version (phpcs --version)
The WordPress rules can be found on Github at the WordPress Coding Standards repo. I’ve opted to use the Standalone installation, which is the simplest and lets you use git to update it in future. The final step of this, actually adding the sniff settings to your PHP CodeSniffer installation, is the most important. It’s also important to double up on your slashes. So, for example: phpcs --config-set installed_paths C:\\dev\\tools\\wpcs. If you don’t do this, it will successfully add the path, but it also will give you an error when you confirm your change with phpcs -i.
If everything went correctly, the command above should list WordPress, WordPress-Core, WordPress-Docs, WordPress-Extra, and WordPress-VIP.
Install Linter and Linter-PHPCS
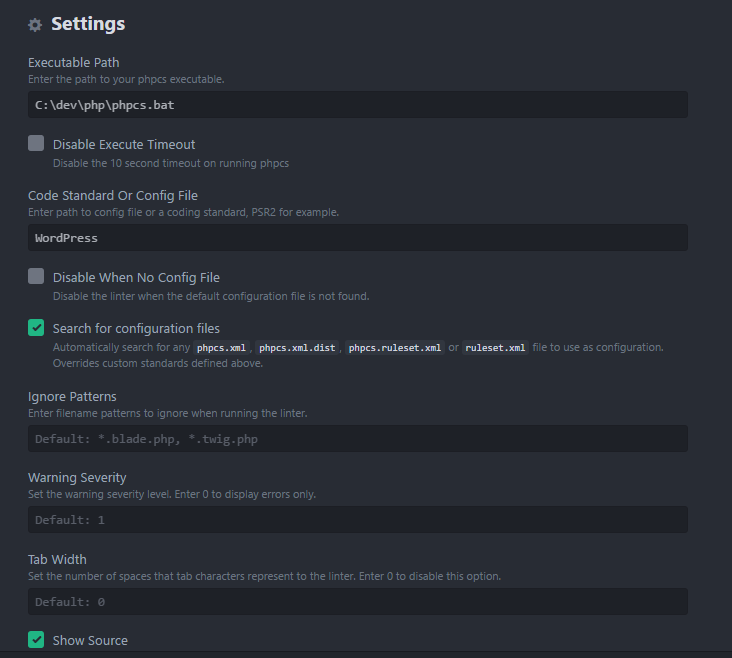
With everything installed, you are now ready to set up Atom to start using PHP CodeSniffer to lint your PHP code. For this very purpose, I’m using the linter and linter-phpcs packages. You should be able to find both of these in the packages list in Atom’s built-in package manager (File -> Settings -> Install). Once they are both installed, click on “Packages” and find linter-phpcs. There should be a “Settings” button that you can click that will allow you to set the package up to use your newly installed CodeSniffer.
My settings look something like this, make sure to set the Executable path to where your phpcs.bat is stored:

Your settings should be saved automatically and you will now be able to use PHP CodeSniffer to lint your PHP code on the fly using WordPress coding standards. For existing files, you will generally hit Ctrl + S to trigger the initial pass on your code. But once it’s going on a file, it will automatically resolve issues it finds as you fix them.
And if your code is anything like mine when I first installed this: Enjoy your red dots of DOOM. There will be many. Good luck!